Thursday, November 28, 2013

Board 139: Lunar Tides

This picture a huge wave about to crash on the shore, and a full moon high in the sky overhead.


Level 1 (Clear 30 red pegs from 93 total - Pro target 425k)

The first design has six horizontal lines going up the wave, with rows of round pegs in between the m.


Attempt #1 - No power ups. Score: 283,150
  • This one is harder than it looks. The round pegs stop the ball from running along the rows and catches are quite awkward. I found it difficult to penetrate through to the deeper rows.

Attempt #2 - No power ups. Score: 626,540 
  • I did much better at getting the ball to run along the lines that time. I didn't quite manage a total clearance - just two pegs short - but that didn't matter.

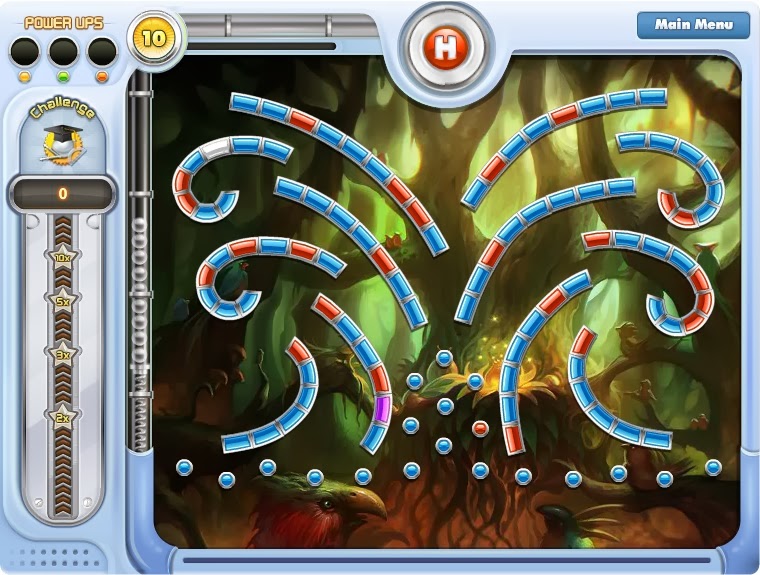
Level 2 (Clear 30 red pegs from 87 total - Pro target 500k)

The second design has nine curves rising up the wave in the picture, and an arrangement of round and diamond-shaped pegs around the moon.


Attempt #1 - No power ups. Score: 256,260
  • Another deceptively tricky level. I only had about two or three red pegs left at the end, but I was a long short of the pro target.

Attempt #2 - No power ups. Score: 552,280 
  • I was in all sorts of trouble there. I was down to my last ball, still with two red pegs left, needing just over 120k for pro and catches were looking hard to come by. The I went for a catch of a purple peg in the top right. I hit the rim of the bucket, ricocheted into a low red peg, then back into the bucket. The bonus combination of Lucky Bucket, Big Bounce, Crazy Distance and Bucket Bounce gave me the 150k I needed for pro, so I could just take out the last red peg for victory.

Level 3 (Clear 25 red pegs from 126 total, with only 9 balls - Pro target 475k)

The third design has three big curves in the sky around the moon, a triangle of six twelve-peg circles, and a diagonal line of diamond-shaped pegs between them, along the crest of the wave. The are three teleport portals - one covering the moon, and a couple more in two of the low circles. They all connect to a receiver in the very top right.


Attempt #1 - No power ups. Score: 371,570
  • Just two red pegs left, but 100k short of the pro target.

Attempt #2 - No power ups. Score: 678,140 
  • I picked up more catches that time, and got some good bonuses as well. Plus two or three balls hung around long enough to pick up an extra ball. I ended up having several free shots at the end after the last red peg was exposed and the pro target was reached.

Level 4 (Clear 30 red pegs from 113 total, with only 8 balls - Pro target 475k)

The fourth design consists of eleven semi-circles, arranged in three interlocking diagonal lines. There are a couple of diagonal lines of round pegs between them.


Attempt #1 - No power ups. Score: 818,260 
  • I found this the easiest level yet on this board. A few sweeps available at the start and the angles seem fairly kind. Or maybe I just got lucky.

Level 5 (Clear 25 red pegs from 117 total, with only 8 balls - Pro target 450k)

The fifth design has a couple of solid curves in the bottom right, and a couple of curves of round pegs there as well. Curving around above them are five circles , four of which contain short lines. I guess these signify phases of the moon.


Attempt #1 - No power ups. Score: 553,750 
  • This again seemed quite easy. It might have been luck of course. Sometimes it's hard to tell. I certainly wasn't unlucky.

Level 6 (Clear 35 red pegs from 126 total, with only 8 balls - Pro target 650k)

The same design as level 3, but with 10 more red pegs, one less ball and 175k on the pro target.

Attempt #1 - Laser Ball. Score: 817,540 
  • This was fairly straightforward with a laser ball. I reached the pro target quite quickly, but I had to be careful not to run out of balls before I'd cleared the red pegs.

Level 7 (Clear ALL pegs - 25 red and 68 blue, with only 9 balls - Pro target 675k)

The same design as level 1, but with 5 fewer red pegs, one less ball, 250k on the pro target, and a total clearance now required.

Attempt #1 - Laser Ball. Score: 647,630
  • A pretty good attempt for a first go. I cleared all the pegs with a ball to spare, but missed out on a pro score by just 30k.

Attempt #2 - Laser Ball. Score: 270,310
  • Nowhere near that time. Mainly because the yellow peg was buried and it took half my balls to get to it for very little score. The laser ball was rubbish when I got to it anyway, so it wasn't worth the effort.

Attempt #3 - Laser Ball. Score: 597,470
  • A 92% clearance. I didn't take enough early catches. I kept the last few going for quite some time, but it wasn't enough.

Attempt #4 - Laser Ball. Score: 611,060
  • An 89% clearance that time, but a marginally better score. Maybe I should add a Big Bounce. A Big Bounce could very easily get stifled though.

Attempt #5 - Laser Ball & Big Bounce. Score: 836,470 
  • Well I added the Big Bounce, but I almost certainly didn't need it. I played a good first ball to get to an awkward yellow peg, and it also took out the whole bottom line which could only help the Big Bounce. The laser ball did quite well, but the Big Bounce was still fairly contained down the bottom. I seemed to have a better grasp of the angles this time, and a bit of luck here and there no doubt helped as well.

Level 8 (Score 600k with 40 red pegs and 73 blue, with only 8 balls - Pro target 925k)

The same design as level 4, but with 10 more red pegs, 350k on the pro target and just a score now to go for.

Attempt #1 - Laser Ball. Score: 850,250
  • It was easy enough getting to 600k, but the extra 325k needed for pro was just a little too far. I had plenty of pegs left to do it with, I just needed more catches.

Attempt #2 - Laser Ball. Score: 755,140
  • I took out the last red peg accidentally, but I never looked like reaching the pro target anyway so I didn't really matter.

Attempt #3 - Laser Ball. Score: 856,300
  • Two or three careless shots in the endgame spoilt a promising position.

Attempt #4 - Laser Ball. Score: 812,320
  • A similar story to several previous games. I was scoring well, but just ran out of balls before I could get to the pro target. I'll add a Big Bounce.

Attempt #5 - Laser Ball & Big Bounce. Score: 956,150 
  • A bit like the previous level, as soon as I add a Big Bounce, I get a pro score, depsite the Big Bounce itself not actually seeming to score many points.

Level 9 (Clear 35 red pegs from 117 total, with only 7 balls - Pro target 750k)

The same design as level 5, but with 10 more red pegs, one less ball, and 300k on the pro target.

Attempt #1 - Laser Ball. Score: 531,900
  • Three red pegs left and quite a way from the pro target. I didn't get the catches that I needed.

Attempt #2 - Laser Ball. Score: 422,280
  • Worse that time. Six red pegs left and even further from the pro target. I'll give it one more go before I add a Big Bounce.

Attempt #3 - Laser Ball. Score: 495,380
  • Two red pegs left, but another poor score. I'll add a Big Bounce.

Attempt #4 - Laser Ball & Big Bounce. Score: 1,062,150 
  • Yet again, I add a Big Bounce, it doesn't appear to make much difference, and yet I get a pro score. This time, the difference was almost certainly down to me picking a different path for the laser ball which worked a lot better.

Level 10 (Clear ALL pegs - 35 red and 52 blue, with only 9 balls - Pro target 725k)

The same design as level 2, but with 5 more red pegs, one less ball, 225k on the pro target, and a total clearance now needed.

Attempt #1 - Laser Ball. Score: 714,790
  • Just four red pegs left, and not far off the pro target. This one surely must go without a Big Bounce.

Attempt #2 - Laser Ball. Score: 796,030
  • Two pegs left, having missed a simple catch right at the end when it all seemed in the bag. Very clumsy.

Attempt #3 - Laser Ball. Score: 693,970
  • Three pegs left. Too many missed catches at the start that time. I did manage to replicate a shot I'd chanced upon in a previous attempt though, which will be useful in future attempts.

Attempt #4 - Laser Ball. Score: 813,140 
  • I started with the shot I rediscovered in the previous attempt, and that started me off with a good score. After that the catches went well. I was a little short of points towards the end, but I had plenty of balls in hand so I could afford to be quite ambitious with my shot selection and that paid dividends.

SUMMARY


Level
Reds
Pegs
Target
Balls
Clock
Pro
Attempts
Record
Average
Video
1
30
93
Reds
10
-
425k
2
626,540
454,845
2
30
87
Reds
10
-
500k
2
552,280
404,270
3
25
126
Reds
9
-
475k
2
678,140
524,855
4
30
113
Reds
8
-
475k
1
818,260
818,260
5
25
117
Reds
8
-
450k
1
553,750
553,750
6
35
126
Reds
8
-
650k
1
817,540
817,540
7
25
93
All
9
-
675k
5
836,470
592,588
8
40
113
600k
8
-
925k
5
956,150
846,032
9
35
117
Reds
7
-
750k
4
1,062,150
627,927
10
35
87
All
9
-
725k
4
813,140
754,482

Sunday, November 24, 2013

Board 7: Sun Shrine

This picture shows a temple in the jungle, built in an Aztec or Incan style. It depicts a shrine perched on top of a huge pyramidal structure with wide stone steps leading up the front.


Level 1 (Clear 25 red pegs from 110 total - Pro target 350k)

The first design contains a number of short, roughly horizontal lines following the steps and levels of the shrine. There are a couple of short diagonal lines near the bottom, and the rest of the building is scattered with round pegs. There are a couple more clusters of round pegs against the sky in the top corners.


Attempt #1 - No power ups. Score: 508,790 
  • That seemed quite an easy starter. I should have had a simple total clearance, but I tried to take a purple peg off the side wall, missed it and hit the last red instead. I still had about 6 or 7 balls in hand, and only five or six pegs left.

Level 2 (Clear 30 red pegs from 106 total - Pro target 400k)

The second design consists of most of a circle in the centre, surrounded by a combination of curves, round pegs and diamond-shaped ones.


Attempt #1 - No power ups. Score: 623,750 
  • Another one completed with several balls in hand and well above the pro target.

Level 3 (Clear 25 red pegs from 93 total, with only 8 balls - Pro target 375k)

The third design is 5½ elongated S-shaped curves running parallel to each other on the left, and a larges disc obstacle to the top right. There are some other diamond-shaped and round pegs scattered about.


Attempt #1 - No power ups. Score: 191,260
  • A couple of red pegs left, but I had to clear a blue peg or two to get through to them, and I couldn't make the required catches. Not enough early catches was the main problem.

Attempt #2 - No power ups. Score: 221,150
  • About four red pegs left. Again too few early catches.

Attempt #3 - Laser Ball. Score: 392,310
  • Just one red peg left but it was underneath the sun disc and I couldn't get to it. I tried to find an angle of the side wall and another peg with my last ball, but I didn't quite get and and missed the catch.

Attempt #4 - No power ups. Score: 129,840
  • Nowhere near it that time. I should've stuck with the laser ball.

Attempt #5 - Laser Ball. Score: 410,540
  • I ran out of balls before I could clear all the red pegs. Again I had one under the sun and lost too many balls trying to find an angle to it.

Attempt #6 - Laser Ball. Score: 556,930 
  • It took a couple of balls to get through to the yellow peg, but then I found a particularly good angle for the laser ball that got a good first bounce, and a good rim bounce to take out 34 pegs and score over 300k. It left me with only seven red pegs and seven balls to get them with. It was still touch and go at times, as not all the reds were easy to get to, but I made it.

Level 4 (Clear 35 red pegs from 107 total - Pro target 425k)

The fourth design has two big curves at the bottom, running in towards the centre, with a fran of round pegs above them, and an arc of diamond-shaped pegs above them. There are some more round pegs at the very bottom, underneath the curved lines.


Attempt #1 - No power ups. Score: 458,110
  • I didn't take any catches except one right at the end. No problem accumulating a pro score, but a long way from clearing the red pegs.

Attempt #2 - No power ups. Score: 533,450 
  • I got a little luckier with the catches that time, plus a few handy bonuses as well. I did it with a couple of balls to spare.

Level 5 (Clear 25 red pegs from 74 total, must play Bank shots - Pro target 500k)

The fifth design features two straight lines, running up the outside of the steps in the picture, with an arrangement of round pegs in lines between them. A pair of solid obstacle walls descends slowly from the top of the screen stopping just short of hitting the diagonal lines, and them going back up again. Their timing coincides with the bucket. So the bucket makes a complete sweep from right to left and back again in the time it takes the walls to either fully descend or fully ascend. These walls are there to help make the high central pegs available off a bank shot, because on this level, all shots must hit the side wall, or an obstacle, before hitting a peg.


Attempt #1 - No power ups. Score: 551,260 
  • Quite a relief to get through this one at the first attempt, although I believe this one comes back at level 10 still with the bank shot restriction, but with a shot clock as well. I thought at first that the pro target would be too high, but by concentrating on the purple and red pegs, the bonuses soon add up. I needed a total clearance to get there mind you.

Level 6 (Score 350k with 25 red pegs and 81 blue - Pro target 450k)

The same design as level 2, but with 5 fewer red pegs, 50k on the pro score and just a score to go for.

Attempt #1 - No power ups. Score: 982,020 
  • I found this layout easy first time around, and if anything, it was even easier this time. I took a total clearance, for over double the pro target, just missing out on a seven figure total.

Level 7 (Clear ALL pegs - 25 red and 85 blue - Pro target 450k)

The same design as level 1, but with 100k on the pro target, and a total clearance now needed.

Attempt #1 - No power ups. Score: 725,910 
  • I just missed out on the total clearance with this layout first time around, but I managed it this time. I missed a few early catches, and I still had quite a lot of pegs left in the endgame, but I managed to clear most of the pegs from the bottom half. After that I knew I had a good chance as I'm pretty good at taking catches off pegs in the top corners.

Level 8 (Score 375k with 25 red pegs and 82 blue - Pro target 475k)

The same design as level 4, but with 10 fewer red pegs, 50k on the pro score, and just a score to aim at.

Attempt #1 - Laser Ball. Score: 624,600 
  • I got the pro score quite comfortably in the end, but I had to remind myself not to take out the last red peg too early. I do have a habit of doing that in these score only levels, forgetting that that finishes the level prematurely.

Level 9 (Clear ALL pegs - 25 red and 68 blue - Pro target 475k)

The same design as level 3, but with 2 more balls, 125k on the pro target, and a total clearance now needed.

Attempt #1 - Laser Ball. Score: 329,490
  • A 94% clearance. I tried to replicate the laser ball path I got on this layout first time around, but got the timing wrong. I was always struggling after that.

Attempt #2 - Laser Ball. Score: 689,980 
  • I managed to replicate the same laser ball that I got on level 3. It didn't score quite as well as last time, but it was still very effective. I had a few lucky catches in there, but overall it was a well orchestrated total clearance. I was having a conversation with the wife at the same time, so I kept having to stop playing while I was talking. I've edited all those pauses out of the video, but I apologise if it looks a little jumpy in places.

Level 10 (Clear 45 red pegs from 74 total, with a 5s shot-clock, must play bank shots - Pro target 650k)

The same design as level 5, but with 20 more red pegs, 150k on the pro target, and a five second shot-clock. The bank shot rule is still in force.

Attempt #1 - No power ups. Score: 530,730
  • Not bad for a first attempt. Only about 120k short of the target, and I had quite a few unlucky missed catches that glanced off the rim of the bucket.

Attempt #2 - No power ups. Score: 535,510
  • Very similar to the previous attempt. I still had half a dozen red pegs left at the end. I'll give it one more go before I add a laser ball.

Attempt #3 - No power ups. Score: 372,050
  • Nowhere near that time. I'll add a laser ball.

Attempt #4 - No power ups. Score: 672,940
  • I forgot to add the laser ball, but I had my best attempt yet. Just four red pegs left, and a score that would have been good enough for pro.

Attempt #5 - Laser Ball. Score: 647,590
  • I got to the last red peg, and went for it as I only had one ball left and catches are always a bit of a lottery at the best of times. I thought I'd probably need to avoid the 10k bucket. I didn't and finished less than 3k short of the pro target.

Attempt #6 - Laser Ball. Score: 902,150 
  • I made a complete mess of the laser ball, missing the bucket altogether, so I thought I blown it early on. A number of useful bonuses and fortunate catches helped me turn it around though. I ended up taking a total clearance for well in excess of the pro target.

SUMMARY


Level
Reds
Pegs
Target
Balls
Clock
Pro
Attempts
Record
Average
Video
1
25
110
Reds
10
-
350k
1
508,790
508,790
2
30
106
Reds
10
-
400k
1
623,750
623,750
3
25
93
Reds
8
-
375k
6
556,930
317,005
4
35
107
Reds
10
-
425k
2
533,450
495,780
5
25
74
Reds
10
Bank
500k
1
551,260
551,260
6
25
106
350k
10
-
450k
1
982,020
982,020
7
25
110
All
10
-
450k
1
725,910
725,910
8
25
107
375k
10
-
475k
1
624,600
624,600
9
25
93
All
10
-
475k
2
689,980
509,735
10
45
74
Reds
10
Bk+5s
650k
6
902,150
610,161

Wednesday, November 20, 2013

Board 138: Mystic Aviary

This picture shows a tree surrounded by others in a dense forest. On a natural shelf on the tree there are a number of weird eggs that appear to be hatching. All sorts of strange birds are perched on this and other nearby trees watching the eggs.


Level 1 (Clear 30 red pegs from 89 total - Pro target 450k)

The first design is a regular pattern of short curves in three separate rows, a bit like the intertwining roots or branches of the trees in the picture.


Attempt #1 - No power ups. Score: 529,780 
  • I quite enjoyed this one. It wasn't particularly easy, but the angles were quite fun to work with. I struggled a little for points, but I managed to leave a red peg until last that offered an easy 100k final bonus.

Level 2 (Clear 30 red pegs from 90 total - Pro target 525k)

The second design looks like the peculiar object in the centre of the picture. It looks like a cross between a flower bulb and a bird's egg. There are a number of curves around it, like the leaves in the nest, and a scattering of single round pegs above it, like the spots of magic light.


Attempt #1 - No power ups. Score: 357,640
  • Three red pegs left, but quite a long way short of the pro target.

Attempt #2 - No power ups. Score: 775,420 
  • A very comfortable pro score that time. I had the points quite quickly thanks to some lucky bonuses. I cleared most of the red pegs and got the chance to play quite a few purples while playing out my spare balls.

Level 3 (Clear 30 red pegs from 84 total, with only 9 balls - Pro target 500k)

The third design is of three eggs, with a few diamond-shaped pegs beneath them.


Attempt #1 - No power ups. Score: 421,370
  • Two red pegs left and not too far short of the pro target, so not a bad first attempt.

Attempt #2 - No power ups. Score: 276,460
  • No catches at all that time, so nowhere near the pro target.

Attempt #3 - No power ups. Score: 276,870
  • I took a couple of catches, but that was all. I'll use a laser ball.

Attempt #4 - Laser Ball. Score: 584,750 
  • It took a couple of shots to get to the yellow peg, but once I had, I cleared quite a few pegs with the laser ball. This made catches a lot easier, and I made quite a few. Enough to get me to the pro target anyway. I missed out on a total clearance by one peg.

Level 4 (Clear 25 red pegs from 120 total, with only 9 balls - Pro target 475k)

The fourth design follows the lines of the picture, with curved lines where the main trunks and branches are, a circle around the eggs, diamond-shaped pegs over the roots, and a few single round pegs in between everything else.


Attempt #1 - No power ups. Score: 424,920
  • I was struggling for points a bit as there were very few easy bonuses available at the start. I had a few balls still in hand at the end when the last two reds went off a ricochet, but I'd picked up quite a big score from that last ball and still finished just over 50k short of the target, so I wasn't as close as you might think.

Attempt #2 - No power ups. Score: 222,420
  • I had five red pegs left that time, and a poor score. This will need a laser ball, I think.

Attempt #3 - Laser Ball. Score: 524,660 
  • It took a few shots to get to the yellow peg, which hampered me quite a bit. I just about managed to struggle my way to a pro score though, but I needed to take the final red peg off the side wall to be sure of it.

Level 5 (Clear 25 red pegs from 110 total - Pro target 500k)

The fifth design looks a bit like a spurt of water from a bit central spout. It comprises of a series of curves the arc out from the centre towards the sides, curling down near the walls.


Attempt #1 - No power ups. Score: 231,070
  • This is another one of those layouts that tends to send the balls down the middle, making catches very hard. I'll need a laser ball, as I'll get nowhere near it otherwise.

Attempt #2 - Laser Ball. Score: 483,430
  • It took an age to get through to the yellow peg, so that cost me lots of balls. In the end, it was just too much as I was left with one red peg left, and nearly enough points.

Attempt #3 - Laser Ball. Score: 1,203,650 
  • I got the yellow peg with the first shot that time, and pulled out a good laser ball. It made a big difference. I rode my luck quite a lot with catches and bonuses, but ended up taking a total clearance for a big seven figure score.

Level 6 (Clear 40 red pegs from 90 total, with only 7 balls - Pro target 725k)

The same design as level 2, but with 10 more red pegs, three fewer balls, and 200k on the pro target.

Attempt #1 - Laser Ball. Score: 808,940
  • It all started well enough, but catches in the endgame didn't seem to get any easier, and I ran out of balls with two red pegs still left.

Attempt #2 - Laser Ball. Score: 722,140
  • Just one red peg left that time, so getting closer. The score wasn't as good as last time, but it was good enough.

Attempt #3 - Laser Ball. Score: 737,540 
  • I got it that time. It may have just been a case of getting to know the angles. I got a lot more catches that time, and catches that I intended, as well. I was only one peg short of a total clearance.

Level 7 (Clear ALL pegs - 30 red and 59 blue - Pro target 675k)

The same design as level 1, but with 175k on the pro target and a total clearance now needed.

Attempt #1 - Laser Ball. Score: 748,900 
  • It took quite a few shots to get to the yellow peg, and I had to improvise a path for the laser ball when I got there, but it worked out OK in the end. Some reasonable catching in the endgame gave me the total clearance I needed.

Level 8 (Score 575k with 25 red pegs and 59 blue, with only 7 balls - Pro target 750k)

The same design as level 3, but with 5 fewer red pegs, two fewer balls, 250k on the pro target and just a score to go for.

Attempt #1 - Laser Ball. Score: 737,830
  • Not quite enough points for a pro score, mainly thanks to the last couple of reds going unexpectedly off a ricochet.

Attempt #2 - Laser Ball. Score: 725,000
  • I managed to leave myself with the same two pegs as last time. A red one right in the middle at the bottom of the middle egg, and a purple diamond-shaped one, immediately beneath it. As a result I couldn't get the purple one first. I managed to take the red one off the side wall, and then the ball bounced around a bit and took out the purple one as well. Unfortunately, both balls then immediately bounced over to the side and disappeared as one into the 10k bucket. So again I finished just short of the pro target.

Attempt #3 - Laser Ball. Score: 959,530 
  • The catches went better that time, and I managed to avoid leaving the same two pegs again. Although I nearly did! As a result, I took a total clearance with balls to spare.

Level 9 (Clear ALL pegs - 30 red and 90 blue, with only 9 balls - Pro target 700k)

The same design as level 4, but with 5 more red pegs, 225k on the pro target, and a total clearance now required.

Attempt #1 - Laser Ball. Score: 818,690 
  • I struggled at the start, getting a poor rim bounce with the laser ball. But I came good in the endgame, stringing a lot of catches together to take out a lot of pegs with the last two or three balls.

Level 10 (Clear 40 red pegs from 110 total, with only 8 balls - Pro target 775k)

The same design as level 5, but with 15 more red pegs, two fewer balls, and 275k on the pro target.

Attempt #1 - Laser Ball. Score: 495,270
  • Three red pegs left, but a long way from the pro target. It took me a lot of shots to get through to the yellow peg, which probably did my score quite a lot of damage.

Attempt #2 - Laser Ball. Score: 799,070 
  • Again, it took some good catching in the endgame to stretch the last two or three balls out in order to clear out a lot of pegs and get a total clearance. I needed it as well, as I still only just made the pro target.

SUMMARY


Level
Reds
Pegs
Target
Balls
Clock
Pro
Attempts
Record
Average
Video
1
30
89
Reds
10
-
450k
1
529,780
529,780
2
30
90
Reds
10
-
525k
2
775,420
566,530
3
30
84
Reds
9
-
500k
4
584,750
389,862
4
25
120
Reds
9
-
475k
3
524,660
390,666
5
25
110
Reds
10
-
500k
3
1,203,650
639,383
6
40
90
Reds
7
-
725k
3
808,940
756,206
7
30
89
All
10
-
675k
1
748,900
748,900
8
25
84
575k
7
-
750k
3
959,530
807,453
9
30
120
All
9
-
700k
1
818,690
818,690
10
40
110
Reds
8
-
775k
2
799,070
647,170

Wednesday, November 13, 2013

Board 137: Painted Passage

This picture shows an underground cave with primitive paintings on the wall. The paintings depict lots of stick men running away from a number of dragons.


Level 1 (Clear 25 red pegs from 97 total - Pro target 425k)

The first design features two big curves outlining the rock pillar, with a few points where the stalactites and stalagmites are. There are a few round pegs scattered over the rest of the picture, with a few diamond-shaped pegs representing the flames of the torches.


Attempt #1 - No power ups. Score: 218,720
  • Four red pegs left when I ran out of balls. Not a great start, but I'll give it another go.

Attempt #2 - No power ups. Score: 414,260
  • I nearly had it that time, but I didn't want to take the last red peg until I'd assured myself of a pro score.

Attempt #3 - No power ups. Score: 407,410
  • I thought I could take the last two red pegs with a single shot, but I misjudged the angle and missed the second peg.

Attempt #4 - No power ups. Score: 524,170 
  • I was short on points again, but I managed to keep the catches going in the endgame that time. I went all the way to a complete clearance.

Level 2 (Clear 25 red pegs from 80 total - Pro target 450k)

The seond design shows two stick men in full flight, just like those painted on the cave wall, only a lot larger. Three lightning bolts can be seen around them.


Attempt #1 - No power ups. Score: 649,060 
  • Again, I managed to keep the last ball going all the way to end for a total clearance. I picked up a whopping score with the last ball this time though - just over 300k, including a 100k Fancy Finale bonus, which I'm not sure I've ever seen before.

Level 3 (Clear 25 red pegs from 101 total, with only 9 balls - Pro target 550k)

The third design features three curved spikes protruding from each side of the screen. I'm not sure whether they're dragon claws , or wing tips, or something else entirely. There are also three horizontal lines in the middle, of varying sizes.


Attempt #1 - No power ups. Score: 171,960
  • This is one of those layouts that funnels the balls down the centre where they're hardest to catch. I'd better use a laser ball.

Attempt #2 - Laser Ball. Score: 1,116,860 
  • Another total clearance, and a seven figure score to boot. A more comfortable one this time, but it definitely needed the laser ball.

Level 4 (Clear 25 red pegs from 96 total - Pro target 400k)

The fourth design has eight v-shapes at the top of the screen, made out of diamond-shaped pegs, five similar but inverted shapes along the bottom, and some round and diamond-shaped pegs in between.


Attempt #1 - No power ups. Score: 375,340
  • About four red pegs left, and a pretty good score. Catches were sometimes quite tricky though. The angles aren't too bad, but the pegs tend to get in each others way.

Attempt #2 - No power ups. Score: 490,530 
  • No total clearance that time, but I got all the reds and reached the pro target, and that was all that mattered. I had to keep the last ball going for a few shots, but by showing a little patience and waiting for the right purple pegs to come along I got to the pro target without too much trouble.

Level 5 (Clear 25 red pegs from 133 total - Pro target 425k)

The fifth design consists of half a dozen jagged lightning bolts in the centre, while down the sides and across the bottom are alternating round pegs and pairs of diamond-shaped pegs.


Attempt #1 - No power ups. Score: 474,630 
  • A tricky layout to judge catches on, but there are quite a few good ricochets to be had. I probably got a bit lucky with the catches. It helped me get through all the reds and get a pro score.

Level 6 (Score 525k with 30 red pegs and 71 blue, with only 8 balls - Pro target 800k)

The same design as level 3, but with 5 more red pegs, one less ball, 250k on the pro target, and just a score to aim for.

Attempt #1 - Laser Ball. Score: 563,250
  • I got the basic score required, but was a long was short of the pro target. I'll give another few goes before I consider a second power up though.

Attempt #2 - Laser Ball. Score: 561,740
  • An almost identical score to the previous attempt. Actually, I think I will add a second power up, as I don't seem to be getting any closer to what is quite a big target.

Attempt #3 - Laser Ball & Big Bounce. Score: 254,600
  • A dreadful effort. The yellow peg was a nightmare to get to. By the time I activated the laser ball, I was down to my last shot, and I couldn't even earn an extra ball with the laser ball, so that was it.

Attempt #4 - Laser Ball & Big Bounce. Score: 548,870
  • Better than the last attempt, but I'm still not getting within 200k of the pro target.

Attempt #5 - Laser Ball & Big Bounce. Score: 697,930
  • I picked a nice final distance bonus when I took out the last red peg from the purple, but I wasn't playing for it, and it still left me just over 100k short of a pro score.

Attempt #6 - Laser Ball & Big Bounce. Score: 798,320
  • I forgot that this wasn't an all clear level, and I took the last red peg instead of the last blue one first. Having said that, the catch off the purple peg was much harder and there was no guarantee that I would have caught it. I finished with a 50k final bucket which left me less than 2k short of the pro target. Gutted!

Attempt #7 - Laser Ball & Big Bounce. Score: 788,660
  • Another really close one. I just needed one more catch at the end to get there, but the ball could only glance off the rim of the bucket.

Attempt #8 - Laser Ball & Big Bounce. Score: 809,990 
  • I didn't expect to get it with this one. I was looking very short of points. I certainly needed the total clearance, and a really big finish at the end of it. But I took the final red off the side wall and picked up 150k from the final buckets, and it was just enough to get me over the line.

Level 7 (Clear 35 red pegs from 133 total, with only 8 balls - Pro target 600k)

The same design as level 5, but with 10 more red pegs, two less balls, and 175k on the pro target.

Attempt #1 - Laser Ball. Score: 438,990
  • Two red pegs left, and a bit short of points, but not too bad for a first attempt.

Attempt #2 - Laser Ball. Score: 536,400
  • One red peg left. It was low and central, but I couldn't see it thinly enough to be able to slide off it into the 100k bucket, so I had to try for another purple peg and missed the catch.

Attempt #3 - Laser Ball. Score: 583,510
  • Another narrow miss. One red peg left again, and closing in on a pro score, but one careless shot blew it for me.

Attempt #4 - Laser Ball. Score: 837,920 
  • A good total clearance this time. The final bucket bonus of 20k was disappointing, but ultimately unimportant as the pro target had been surpassed some time before.

Level 8 (Clear 35 red pegs from 96 total, with only 8 balls - Pro target 650k)

The same design as level 4, but with 10 more red pegs, two less balls, and 250k on the pro target.

Attempt #1 - Laser Ball. Score: 363,500
  • Not a particularly good attempt. I didn't pick up many catches of bonuses in the early part of the game, and I was left with way too many reds to clear with the last two or three balls.

Attempt #2 - Laser Ball. Score: 341,480
  • Again a poor effort. The laser ball isn't taking out many pegs. I'll add a Big Bounce.

Attempt #3 - Laser Ball & Big Bounce. Score: 677,940
  • I had a much better grasp of the angles that time, and very nearly had it. I had the points for a pro score, but ran out of balls one red peg short.

Attempt #4 - Laser Ball & Big Bounce. Score: 558,220
  • Two red pegs left that time. I'm a lot closer with both power ups. It's only a matter of time before this one goes.

Attempt #5 - Laser Ball & Big Bounce. Score: 478,410
  • Four or five red pegs left that time, and I never got around to triggering the Big Bounce.

Attempt #6 - Laser Ball & Big Bounce. Score: 695,620 
  • I managed to use all the knowledge of the angles that I've picked up over the last 5 attempts and put it all into practice here. I kept the catches going all the way through to a total clearance.

Level 9 (Clear ALL pegs - 35 red and 62 blue, with only 8 balls - Pro target 725k)

The same design as level 1, but with 10 more red pegs, two less balls, 300k on the pro target and a total clearance now needed.

Attempt #1 - Laser Ball. Score: 626,080
  • One peg left, so one catch from success. Of course, there was no guarantee that I would have made the pro target. But not bad for a first attempt.

Attempt #2 - Laser Ball. Score: 905,110 
  • Had a much better grasp of the angles this time, and went through it without too much difficulty.

Level 10 (Clear ALL pegs - 25 red and 55 blue, with only 8 balls - Pro target 750k)

The same design as level 2, but with two less balls, 300k on the pro target and a complete clearance necessary.

Attempt #1 - Laser Ball. Score: 548,180
  • Just an 84% clearance, and that was with a laser ball. It's hard to believe I got a total clearance at the first attempt without power ups on level 2.

Attempt #2 - Laser Ball. Score: 881,890 
  • That was more like it. I found the angles much easier that time. Much more like level 2. I kept the catches going all the way to the end with balls in hand.

SUMMARY


Level
Reds
Pegs
Target
Balls
Clock
Pro
Attempts
Record
Average
Video
1
25
97
Reds
10
-
425k
4
524,170
391,140
2
25
80
Reds
10
-
450k
1
649,060
649,060
3
25
101
Reds
9
-
550k
2
1,116,860
644,410
4
25
96
Reds
10
-
400k
2
490,530
432,935
5
25
133
Reds
10
-
425k
1
474,630
474,630
6
30
101
525k
8
-
800k
8
809,990
627,920
7
35
133
Reds
8
-
600k
4
837,920
599,205
8
35
96
Reds
8
-
650k
6
695,620
519,195
9
35
97
All
8
-
725k
2
905,110
765,595
10
25
80
All
8
-
750k
2
881,890
715,035

Sunday, November 10, 2013

Board 8: Ash Summit

This picture shows a huge volcano, standing on its own in the middle of a vast plain. The volcano is clearly active as smoke is pouring from its summit. A few bare trees stand in the forground.


Level 1 (Clear 25 red pegs from 100 total - Pro target 350k)

The first design features five lines coming down the sides of the volcano, with some single round pegs at the summit. The rest of the design is covered with short, three peg lines and round pegs.


Attempt #1 - No power ups. Score: 492,120 
  • It can be a tricky layout this one, although it gets a lot trickier later when it reappears without a ball bucket. I needed all my balls, but I made it to the end, and thanks to a few lucky bonuses, I had no problem reaching the pro target. The video for this one didn't work very well (I missed the start somehow), so I rerecorded it. On the second attempt, I got a slightly better score - 516,290 - and felt a bit more in control as I went through the red pegs.

Level 2 (Clear 25 red pegs from 106 total - Pro target 450k)

The second design features three teleport portals which all connect to a single receiver at the summit of the volcano. Each portal has a five peg curve underneath and four or five diamond shaped pegs above it. Otherwise the bottom half is full of round pegs.


Attempt #1 - No power ups. Score: 356,130
  • Just one red peg left, but I couldn't get it in the bottom right hand corner, and my score needed to be better anyway.

Attempt #2 - No power ups. Score: 470,960 
  • I got very lucky with catches in this one. And I needed it too. I don't think I'd have got anywhere near this one without that.

Level 3 (Clear 25 red pegs from 116 total - Pro target 450k)

The third design has three curved stripes on the side of the volcano, each with a row of round pegs beneath. The other main feature of the design is the tree on the right. The trunk and main branches are picked out with lines, and the foliage at the top is a thick cluster of round pegs. Also a wavy line of round pegs runs along the bottom.


Attempt #1 - No power ups. Score: 406,260
  • I thought I could catch a deflection off the final red peg into the centre bucket, so I went for it a little early. I came of the edge, though, and ended up in the 10k bucket so I didn't manage a pro score.

Attempt #2 - No power ups. Score: 236,490
  • Nowhere near that time. I still had about 10 red pegs left at the end. I took hardly any catches, which was the problem. All those round pegs everywhere make catches something of a lottery.

Attempt #3 - Laser Ball. Score: 671,140 
  • Got it easily enough with the laser ball. Although it took me a few shots to hit the yellow peg at first. It really shouldn't have done as it wasn't hard to get to. Too many missed catches at the end meant I didn't get a total clearance, but that didn't matter.

Level 4 (Clear 25 red pegs from 104 total - Pro target 450k)

The fourth design looks like a spinning vortex. A ring of a dozen round pegs in the centre rolls around the middle of the design.


Attempt #1 - No power ups. Score: 134,160
  • The reds were dreadfully placed as there were none on top at all. I took no catches during the entire game, so it was a dreadful score with lots of red pegs left at the end.

Attempt #2 - No power ups. Score: 401,050
  • Just one red peg left, but wanted some more points in the bag before I took it. I missed a catch off the purple peg though.

Attempt #3 - No power ups. Score: 298,400
  • I didn't get much luck there. I needed more early catches really, and the bonuses weren't coming either. I'd better use a laser ball.

Attempt #4 - Laser Ball. Score: 465,220
  • Three red pegs left, but I wasted the last two balls looking for a deflection off a moving red peg onto a buried one. I missed everything both times, and didn't get the ball back. Annoying as I had the points for pro.

Attempt #5 - Laser Ball. Score: 578,190 
  • It took me three shots to get the yellow peg, as it was one of the spinning ones, but I caught the first two through sheer luck, so I had nothing to complain about really. In fact, the luck was generally with me throughout that game.

Level 5 (Clear 25 red pegs from 115 total - Pro target 475k)

The fifth design has two solid lines tracing the horizon lines either side of the volcano summit. Beneath these lines is a sea of round pegs. The bottom three rows of pegs move up and down, one column at a time.


Attempt #1 - No power ups. Score: 536,280 
  • I found a good early shot which took out almost the entire left hand top line on a big sweep. After that I needed a bit of luck with the catches, which I got. Towards the end I was still a little short of points and running out of balls, but a couple of timely Crucial Bounces at the end got me over the line.

Level 6 (Score 400k with 25 red pegs and 81 blue - Pro target 500k)

The same design as level 2, but with 50k on the pro target, and just a score to go for.

Attempt #1 - Laser Ball. Score: 373,860
  • I only left five pegs in total, but I just wasn't picking up the bonuses.

Attempt #2 - Laser Ball. Score: 485,990
  • I went for an early finish as I'd done well to get as far as I had. I just needed to avoid the 10k bucket at the end, but my luck ran out and I couldn’t manage it.

Attempt #3 - Laser Ball. Score: 497,180
  • I miscalculated there. I thought I had a pro score guaranteed with a total clearance, but then two 10k final buckets left me nearly 3k short.

Attempt #4 - Laser Ball. Score: 599,410 
  • I didn't manage to clear the red pegs, because I was going for a total clearance and missed the very last catch. This was purely a point scoring level though, so that didn't matter. I'd reached the pro target several shots before, so the clearance was academic anyway.

Level 7 (Clear 45 red pegs from 115 total, with only 8 balls and a 3s shot-clock - Pro target 525k)

The same design as level 5, but with 20 more red pegs, two fewer balls, 50k on the pro target, and a three second shot-clock.

Attempt #1 - Laser Ball. Score: 636,830 
  • I started with the shot I discovered on level 5 which took out most of the top line, and I found a good line for the laser ball. I managed to keep thinking quickly as a three second shot-clock forces you to keep moving. I managed a few good catches, and took a relatively comfortable pro score in the end.

Level 8 (Clear 55 red pegs from 116 total - Pro target 550k)

The same design as level 3, but with 30 more red pegs, and 100k on the pro target.

Attempt #1 - Laser Ball. Score: 692,190 
  • I managed to find the yellow peg with the first shot, and then my standard laser ball path worked quite well. After that it was just a matter of picking off the red pegs without missing too many catches.

Level 9 (Clear ALL pegs - 25 red and 79 blue - Pro target 550k)

The same design as level 4, but with 100k on the pro target, and all pegs are now required.

Attempt #1 - Laser Ball. Score: 537,740
  • An 86% clearance, so still some way to go. This layout seems well suited for a Big Bounce, so I think I'll add one of those.

Attempt #2 - Laser Ball & Big Bounce. Score: 813,030 
  • Got it that time, with the extra power up, and quite comfortably too. I easily beat the pro score, and could afford to miss quite a few catches towards the end.

Level 10 (Clear 35 red pegs from 100 total, with no ball bucket - Pro target 425k)

The same design as level 1, but with 10 more red pegs, 75k on the pro target, and no ball bucket.

Attempt #1 - Laser Ball & Big Bounce. Score: 298,290
  • Four red pegs left. I'm attempting a method that has worked for me in the past. Try to get the white peg first, hope for a bonus that introduces a bucket, then activate the laser ball and bounce it off the bucket. I got the white peg first that time, but didn't get a bucket from it, just a Double Score.

Attempt #2 - Laser Ball & Big Bounce. Score: 484,810
  • A better effort, just two red pegs left and a score worthy of pro. I only managed a Double Score off the white peg again though.

Attempt #3 - Laser Ball & Big Bounce. Score: 218,780
  • I got Free Energy this time. After that, the ricochets just wouldn't come, and I was left still with 8 red pegs at the end.

Attempt #4 - Laser Ball & Big Bounce. Score: 817,910 
  • It worked like a dream that time. That is undoubtedly the best strategy for these layouts without a ball bucket. So, to recap, the strategy is to take the white peg first, activating a bucket of some sort (3 in 9 chance) but don't land in it. Then activate the laser ball, but again, don't land in the bucket. Then use the bucket to bounce to laser ball off, giving you a huge point bonus and taking out a lot of the remaining red pegs. There are several things that can go wrong, of course, but when it works, it should get you a pro score.

SUMMARY


Level
Reds
Pegs
Target
Balls
Clock
Pro
Attempts
Record
Average
Video
1
25
100
Reds
10
-
350k
1
492,120
492,120
2
25
106
Reds
10
-
450k
2
470,960
413,545
3
25
116
Reds
10
-
450k
3
671,140
437,963
4
25
104
Reds
10
-
450k
5
578,190
375,404
5
25
115
Reds
10
-
475k
1
536,280
536,280
6
25
106
400k
10
-
500k
4
599,410
489,110
7
45
115
Reds
8
3s
525k
1
636,830
636,830
8
55
116
Reds
10
-
550k
1
692,190
692,190
9
25
104
All
10
-
550k
2
813,030
675,385
10
35
100
Reds
10
NBB
425k
4
817,910
454,947